Friday, February 28, 2014

There isn't much I could do… {scrapbook circle}


Are you still on the fence about the Portabello Road March kit from Scrapbook Circle? Here's another layout that might sway your pocketbook. 

On top of the bright colors, there is also this great Stars paper from Elle's Studio. At first I was going to save it and then I thought better of it — gotta use it if I love it, right?!


Then I went on a bit of a layering rampage with the scraps leftover from the other projects I made. This is one of my favorite things to do when I get to the end of a kit.

I also added a custom-cut stitched title in my white space to finish it off. 


Thanks for stopping here today! I hope you are all set to have a great weekend.

If you grab the Portabello Kit, use my coupon code (DIANAF20FF) for 20% off your purchase. 

Thursday, February 27, 2014

Pinterest inspiration {bella blvd}


Today at Bella Blvd we are sharing projects inspired by this wonderful, bright image found on Pinterest. I don't know about where you live, but I am so tired of winter and this color palette gives me hope for spring.

I made two cards based off the inspiration from this photo. In this first one, I used the colors and the linear movement of the image to inspire the card.


Supplies: Lucky Starz (Color Crazy Starz, Candid Cards), Family Forever (Paper Pieces Die Cut Shapes, Trinkets)


For this second card, I took the image very literally and mimicked the background both with the strips of paper and in the gradients of the colors. I have to admit that I love how this turned out!


I even weighted the bottom the card more by anchoring the sentiment to the bottom edge to reflect the table and decor in the image. 


Supplies: Lucky Starz (Peep Starz, Color Crazy Starz, Carrot Starz, Bell Pepper Starz, Punch Starz, Candid Cards, Trinkets) Designer Tape (Yellow Chevron)

So, how are you liking the new collections from Bella Blvd? I have really enjoyed working with these collections — especially Max and Lucky Starz. So much fun from one great company! Check it out if you haven't already!

Wednesday, February 26, 2014

Today was awesome {scrapbook circle}


The Portabello Road March kit from Scrapbook Circle is a new favorite of mine. It might be this never-ending winter we are having or the lack of sunshine dragging me down, but I was more excited than usual to see the bright colors in this kit. 

It felt like an 80 degree day hit me when I opened the box. And trust me, I needed it!


I went straight for the Basic Grey Capture papers that are in the kit and started to play around with making the bright bold patterns play together on a page.

For the triangle pattern, I made it in the Silhouette software and cut it from a sheet of cream / off-white card stock. I then backed each space separately with snippets of the pattern papers.

 > YOU CAN DOWNLOAD THE TRIANGLE PATTERN FOR FREE HERE <


A series of silly selfies with my boy help round out the fun on this layout. We were at Red Robin with friends after seeing The LEGO Movie for the second time and we were feeling silly. Or should I say… "awesome!"

Thanks for hanging out here today. Make sure to grab the free studio file download for your Silhouette. 

And if you are interested in purchasing Portabello Road or one of the amazing add ons, make sure to use code DIANAF20OFF for 20% off your purchase.

Tuesday, February 25, 2014

Robot card {scrapbook circle}


The March 2014 kit for Scrapbook Circle is easily one of my favorite kits! As many of you know, I scrapbook for a 7-year-old boy and this kit is perfect for that age. 

There have even been references among us teammates that it is perfect for the current LEGO Movie excitement going on right now.


Without giving away too much of what you can expect with this kit (on sale soon!), here is a card I made using some of the Crate Paper goodies in the kit. 

Loving the robot! And inside the card (which I forgot to take a picture of, d'oh!) is the exclusive stamp for the month: "Today is a Happy Day." What a great sentiment to have on hand!


Are you putting this kit on your wish list? It is sure to go quickly. If you do purchase from Scrapbook Circle, make sure to use my coupon code, DIANAF20OFF, for 20% off your order.

Monday, February 24, 2014

Anchored since 2004


Many of you that have read my blog for awhile or follow me on Facebook know that I love anchors. Heck, I even have one tattooed on my arm — so I better like 'em! 

I have been meaning to hang a picture in this space in my living room for awhile now, but I like to look for just the right piece when I add things to my home. Even if it takes more than a year, as it did in this case. 

To make this, I used three coats of chalkboard paint to cover what was previously on the wooden tray. Then I cut a 7" wide x 11.5" high anchor on my Cameo from a Silhouette studio file. I cut it out of light gray vinyl, not white. I felt like the light gray went better with the chalkboard paint and was a little more muted. 

To cut the "est. 2004," I typed it out in the Silhouette software with the font Blackjack and then applied a Weld on the word "est" so that it would be all one piece. The "est. 2004" is our wedding date. I chose that over our move-in date for the house, but you could use any important date if you choose to make one similar to this.


The whole process took two days because of drying times on the paint. I love how it turned out and it really helps tie the space together. As much as I love the snowman and snowflake candles, I am already plotting a more spring-like decor for next month. 

Thanks for hanging out here today! 

Friday, February 21, 2014

Challenge 1 | Birthday {avery elle}


Hello! Today is my first post as part of the Avery Elle Challenge Team. Our first challenge is "Birthday." There are so many Avery Elle stamps that can be used for birthday cards. 


For my card, I chose the Happy Birthday sentiment from the Thanks A Bunch Clear Stamps set and the giraffe from What's Up set. The clouds in the background are also from the What's Up set and colored in with a very light Copic marker. 


Who wouldn't want to see this cool-as-a-cucumber giraffe on their birthday card?!

Stop by the Avery Elle blog to see more sample cards and to play along with the first challenge!

You have until 3/2/14 at 12:01 am (PT) to play along and a winner will be announced on March 6th.
You must include at least one Avery Elle product in order to be eligible for the prize and the project must be NEW for the AEI♥U Challenge. Players can enter as many projects as they wish. The winner will receive a free Avery Elle stamp set of their choice.

Wednesday, February 19, 2014

Wish {viva las vegastamps}


Hi! Today I'm sharing a simple card using the Dandelion stamp from Viva Las VegaStamps. I chose this stamp because I love the whimsy of it blowing, and that the stamp came with an extra little seed stamp so that you could add just one more little seed where you wanted.


The background is a 4x6 card from Elle's Studio that I cut down to 4x5.5, and the "wish" stickers are also from Elle's Studio. I like how the bright spring-like colors match the fun of the dandelion.

For more inspiration from Viva Las VegaStamps, check out their blog!

Monday, February 17, 2014

Blue icee days


Hi! Popping in today to share a layout I made. I went to a crop in January and there was a little shop set up. I was so excited to see the fair isle pattern paper from Fancy Pants - Timbergrove collection. I love that pattern! 

I scooped it up along with a replenish of some of the other Timbergrove goodies, and I got a chance to play this past weekend.  


This top cluster is a mix of stars from Studio Calico and The Paper Bakery. I love putting the solid with the line stars.


An envelope and tag are nestled in the background behind a picture. And below, the letters are new from Recollections. I scooped up a couple packs of these from Michaels. They are canvas and added great texture to this page.


Thanks for stopping to see my layout today! It was nice to spend a little time over the weekend working with some of my favorite pieces. 

Saturday, February 15, 2014

The Bella Buzz Newsletter {feb 2014}


The Bella Buzz Newsletter for this month is ready! If you missed yesterday's announcement, here is the link to the newsletter. It makes for a great weekend read with a cup of coffee. 

Friday, February 14, 2014

Wednesday, February 12, 2014

Samantha Walker Creative Crafters Team Blog Hop {love}

Welcome to the Samantha Walker Creative Crafters Team Blog Hop! You should have come to my blog from Cristal (Pinky) Hobbs. If you found me first, make sure to start back at Samantha Walker's blog to catch all of the fun from the beginning.

This month's lucky winner will receivthe Spellbinders' Butterfly Garden Grand Impressabilities.

...and be eligible for the free SVG/Silhouette file for this month. Be sure to look extra closely at Step #4 below to learn how you can get this FREE SVG and Silhouette Studio file:


To enter, just leave a comment on Samantha's blog during Wednesday 2/12 until Sunday 2/16. The winner will be announced on Samantha's Facebook page on Monday 2/17.

For additional entries:
1. Receive an additional entry for commenting on each of the other blogs in the blog hop.
2. Go here and follow Samantha Walker's blog. 
3. Follow her on Facebook.
4. Sign up for an e-mail subscription to Samantha's blog and you will automatically receive a link to a free SVG cutting file that you can download and use on your personal electronic cutter. If you are already a subscriber, just enter in your information in the secure form on Samantha's blog!  The free files will be e-mailed early next week!


To receive the additional entries and get the free files, mention in your comment on Samantha's blog that you have done so! 

Now for this month's theme: LOVE


For this month, I made a matching card and vase set. It was pretty simple to make, but the end result is a lovely little display or gift to mark the Valentine's Day holiday.

First I cut the LOVE heart out of teal vinyl and affixed it to the vase. Then I adjusted the Cameo for card stock, resized and cut again the LOVE heart for the card. A teal enamel heart replaced the red card stock heart for just a little fun.


I cut the flower from a Samantha Walker file for a 3-D flower. It is three cuts at three different sizes, layered and glued together. I then added an enamel red heart to the center.


Supplies: Samantha Walker Silhouette Studio Files ("love heart" and "flower spiral gardenia")

Your next stop on the hop is Cathy Harper ... Click on the image below to keep on hopping!


Thanks for hopping along with us this month! 


Tuesday, February 11, 2014

Guess who loves you?!


I'm continuing with my Valentine's Day celebration that I started yesterday. Today I'm sharing an easel I decorated using the Jillibean Soup Hearty Healthy collection. I had a lot of good pieces left over after I made the layout from yesterday, so I decorated this chalkboard/whiteboard easel I picked up at JoAnn Fabrics. 


For Valentine's Day, I'll leave little notes on the board for my son. He'll get little treats and goodies leading up to the day.

It's hard to tell here (I just couldn't get a good picture of it) but the fox heart is on a spring, so when my son moves the easel or takes his notes off the board, it bounces. He thought it was pretty fun.


And don't laugh, but we have a Valentine's Day tree. I just can't stand to lose the soft glow from the Christmas tree when it is still so miserable outside, so here is our tabletop silver tree decorated with a love bug, pink glitter and silver bulbs.  

I hope you are enjoying my week of love. Thanks for stopping by here today! 

Monday, February 10, 2014

My heart belongs to you


This Friday is Valentine's Day, so I wanted to share some layouts and cards this week focused on the holiday. 

I went to a crop last month and had a chance to play with some Jillibean Soup goodies I had ordered right after the holiday. I started this layout with an older PageMaps sketch I found on Pinterest. I really liked the hexagons for the background and then went from there.


To make this, there are three layers. A dark red background, a white foreground page and then foam dots popping up the hexagons. In person, this layout has great dimension.


The pictures in the layout are both from this past summer — random shots just hanging out together and being silly. My favorite pictures of us are never the ones we get dressed up to take. We do much better when we are on-the-fly and usually taking selfies. 

Thanks for stopping to see my layout. I have more "love" for you later this week, so stop back by if you are in the mood. 

Sunday, February 9, 2014

My craft space {bella blvd}


Yesterday on the Bella Blvd blog I shared some details and photos about my craft space. It's always nice to go around the room and really look at the space you create in. I recently did a big purge, but even when I was getting ready to take these pictures, I saw more opportunities to de-clutter and organize.


My studio is the third biggest of four bedrooms in our home. It is upstairs, the windows look out onto the front yard and it gets great light in the mornings. I had been in the smallest bedroom, but quickly outgrew that space a couple of years ago. I now have the space for two tables, two chairs and a bigger closet.


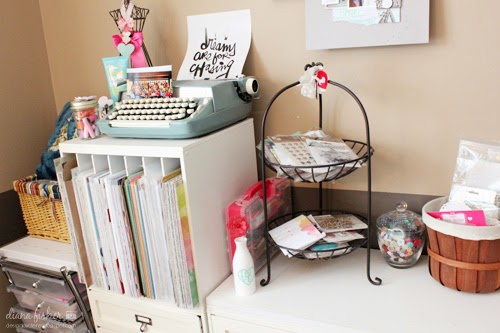
The items I use most are kept on the desk first, then the two-tier wire basket on the shelving unit or in the little basket by the printer. I shuffle things around often so that what I am using most is always at my fingertips and I don’t need to sift through drawers or bins.


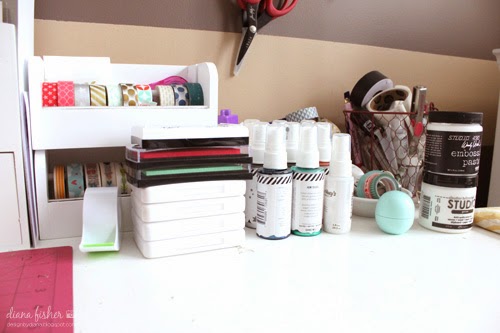
Here on my desk I only keep a few mists and inks and supplies that I’m in the mood to use now, or are color-coordinated with projects I am currently working on. Then, with the change of seasons or holidays, they will swap out with others.


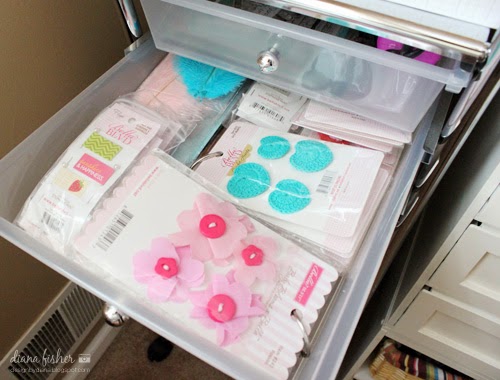
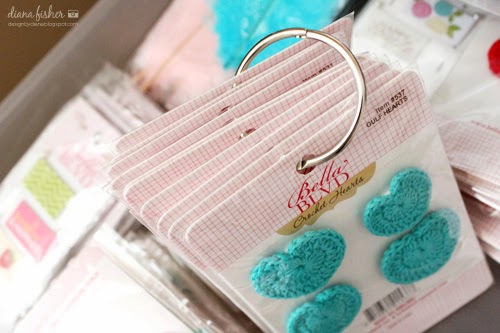
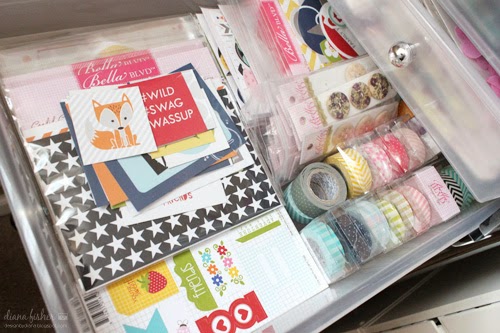
Since this was for Bella Blvd, I wanted to showcase how I store those items. One of the things I'm happy I did was put any of the items from Bella Blvd that have a hole on a binder ring. It makes it so easy to pop them in and out of the drawer as a group. Then I just flip through to the color I want. I did that with all flowers and feathers for the brand.


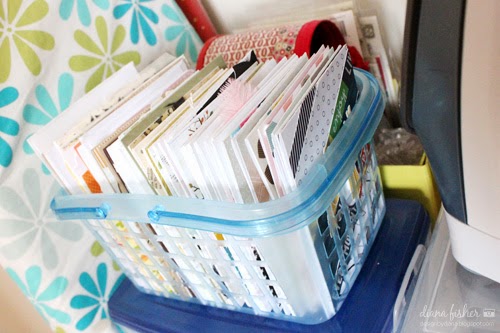
As a card maker, I often get asked about how I store all of my cards. This teeny tiny basket is it! It keeps them neat and ready to go for when I need them. When the basket gets too full, I go on a binge and send out a bunch of smiles to my friends and family, or I take them to work and hold a discounted trunk show and my co-workers buy them for half the cost I would normally sell them at.


Everyone has the stash of markers. These are the most-used colors and styles in kept in reach.


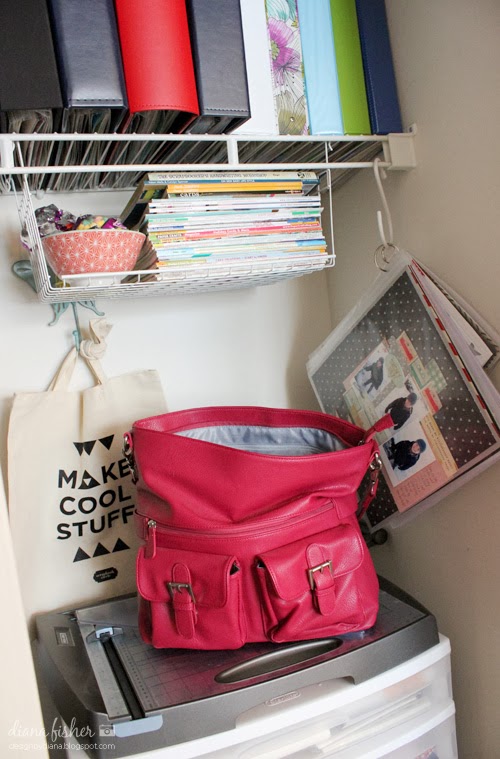
My closet is premium space. Some of you may remember a past post where I talked about hanging my layouts on hooks before I put them in albums. Here are a couple off to the side of my camera bag.


Lastly, here are two Pier One frames that I hang favorite cards and layouts on before they move to the hooks or basket. I like to be able to look at many of the pieces I make for a little while before I sort and hide them away in the closet.


So there you have it! If you've seen my craft room tour before, there might be some updates. I get restless and organize a lot —I'm not a fan of clutter.

Hope your weekend was great, and thanks for stopping here today.